Saturday, June 20, 2009
Dinner – Car Camping – Smoked Salmon & German Potato Pancakes
Ingredients:
4-5 small/medium potatoes per person (we prefer white potatoes)
1 small onion
1 or 2 eggs (depending on amount of potatoes used)
A handful of gluten-free oats
Salt
Oil for frying
Toppings:
Smoked salmon
Sour cream
Apple sauce
This dish is a little bit time consuming, but we love it, so we don’t mind. First, grate the potatoes (for 2 people we usually use about 8 or 9 medium size potatoes). We usually grate them pretty small, because then it is easier to fry them (they won’t fall apart). Once grated, drain off the excess liquid. Mix in 1 small onion (also grated small) and 1-2 lightly beaten eggs (we usually use 2 eggs for 2 people), some salt and a handful of GF oats. You can also add some grated carrots, if desired. Heat some oil in a frying pan and add about ¼ cup of the mix for each potato pancake. Fry them like you would regular pancakes, flipping them once after they start to turn golden brown. They are best when they are fresh out of the frying pan. We love to top them with smoked salmon and sour cream and/or apple sauce. Kids love them, too!
Thursday, April 2, 2009
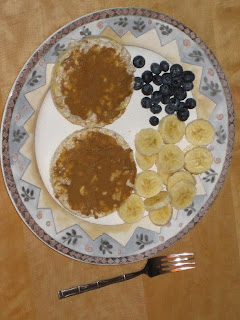
Breakfast - Car Camping - Rice Cakes with Sunflower Butter
Here is another easy one! We have it listed as a car camping recipe, but some variation may be possible for short backpacking trips. This can be summed up in a photo, but let's look at it anyway just to be consistent ;)
Rice Cakes
Sunflower Seed Butter
Fruit
I often eat this for breakfast at home, but it would be super easy to make at the campsite. This would be easy to take on a hike and eat for a snack. It could even substitute for a lunch on a rainy day when you don't want to stand outside cooking.
Variations? Change the fruit or the kind of butter.
My friend suggests almond butter. Thanks Corinne!
Tuesday, March 24, 2009
Dinner - Car Camping - Camper’s Taco Pie
Camper’s Taco Pie
This recipe uses a Dutch Oven in the fire but could also be made as a “hobo pack” in the fire.
Ingredients
1 Lb of ground beef (could use turkey or just vegetables)
Small onion
Small green pepper
1 can of corn
1 can of black beans
2 cans of Rotel (canned tomatoes with chili peppers)
Grated Cheese
Enchilada Sauce: Can take a packet of McCormick’s with you and make at the camp site with water and a can of tomato paste or make your own enchilada sauce.
My Sauce: One 12 ounce can of tomato paste, one packet of McCormick chili mix, one can of milk (12 ounce can from tomato paste) and one can of Portobello Mushroom Soup by Imagine (12 ounce can from tomato paste) This makes a very thick enchilada sauce.
1 package of soft corn tortillas (make sure that they are GF) I use La Banderita
Assemble the Pie
1. Cook the ground beef, onions and green peppers together before you leave on your camping trip. Freeze in a zip lock back and the packet will thaw as you are driving to your camping location.
2. Open the corn, black beans and rotel and mix together
3. I make my enchilada sauce at home and keep in a cooler but you can quickly mix-up the McCormick sauce at the camp site
4. Put a thin layer of sauce on the bottom of the Dutch oven to keep the first layer of corn tortillas from sticking. (same for hobo packet)
5. Layer a corn tortilla, veggie mix and meat mix and cheese as if you are making lasagna. End the “stack” with a tortilla, sauce and then cheese
6. Put the lid on the Dutch oven and place in hot coals with hot coals on top of oven. (or close up your hobo packet by wrapping it in an extra layer of heavy-duty foil)
7. Since the meat is already cooked, you are really just heating the pie up at the camp site. I have even eaten this cold the next day. Also the un-used corn tortillas make a great snack with a can of re-fried beans, salsa and cheese the next day—or for breakfast as egg wraps.
Note: The pie will heat up very fast as a hobo packet. I suggest placing the packets on a grate over the fire and not directly in the fire.
Thanks, Kim Chappell, for submitting this recipe and photo! It looks great! Maybe we'll try it veggie hobo style ;-)
Snacks and Grab-ables
Please be sure to check that each of the products you select are gluten-free.
We hope that you'll contribute to this list of Gluten-Free Snacks and Grab-ables over time :)
Celery with Peanut Butter
Popcorn
Jerky (Beef, Turkey, Salmon, etc)
Energy Bars (Larabar, Honey Stinger)
Nuts & Dried Fruit
Hard Boiled Eggs
Cheddar Cheese Wedges
Fresh Sliced Jicama
Carrots or other Veggies
Crispy Rice Bar *
Granola Bars **
GF Pretzels
GF cookies ***
Cheese Sticks
Fruit
Cold GF pancakes
Rice Chips
Potato Chips
Tortilla Chips
GF Brownies
Banana chips
Nuts
Yogurts
Single serving apple sauce packs
Pudding packs
cupcakes ****
Meringues *****
* Envirokids makes a good Rice Bar
** Look for recipe in this blog
*** We make peanut butter cookies. We also like Pamela's Chocolate Chip. Trader Joe's has GF Ginger Snaps
**** We buy GF cake mix and make individual cupcakes
***** We buy ours at Trader Joe's, but we've seen them elsewhere
Thanks Kim & Katie for contributing ;)
Please post your snacks and opinions. Thanks!
Monday, March 2, 2009
On The Road - Greek-Style Pasta Salad
Ingredients: (8 servings)
1 package of your favorite GF pasta (cooked and cooled beforehand)
1-2 small chicken breasts (marinated in Italian dressing and cooked separately)
½ cup extra virgin olive oil
¼ cup lemon juice
¼ cup red wine vinegar
1 large cucumber (peeled and quartered)
½ cup red onion (chopped or slivered)
2-3 tomatoes (if desired – but these don’t stay fresh as long)
1 cup crumbled feta cheese (check to make sure it’s gluten-free)
½ tsp salt
1 tsp dried oregano
Parsley (fresh or dried)
Baby spinach leaves (if desired)
Boiled eggs
Preparation:
Cook the pasta in lightly salted water (until al dente) and drain.
In a large bowl, mix the olive oil, lemon juice, red wine vinegar, parsley, oregano, and salt. Add the pasta and toss to coat. Cover, and chill for a couple of hours in the refrigerator. In the meantime, marinate the chicken in Italian dressing and then bake it at 350 degrees. When cooled, slice it up and later add it to the salad. You could also grill the chicken.
Boil eggs in a separate sauce pan and allow them to cool. Then peel and quarter.
Add the onion, cucumber, feta cheese, tomatoes and fresh spinach to the pasta. Arrange the quartered eggs around the salad to serve or leave them whole if you want to take the salad with you.
Note - The pasta is bionaturae Organic Gluten Free fusilli made with rice, potato and soy. We bought it at Whole Foods recently and tried it for the first time - we like it.
Thursday, February 19, 2009
Dinner - Car Camping - Hobo Stew
Contributed by my friend Autumn on Facebook - Thanks Autumn! :-) It sounds great!
If anyone makes this recipe, feel free to email me the photo so I can post it here!
"Ok...so you take a large piece of aluminum foil and spread it out on a table.
First put a large slice of onion down.
A tab of butter or some oil.
Then a hamburger patty seasoned with favorite seasonings
Add thin sliced potatoes, mushrooms, peppers, or what ever you like for vegetables.
Top with more seasonings and a tab of butter or some oil.
Seal the foil around the pile of food and place over coals on rack or rock near coals or on grill. Cook for approx 20-30 min...until all veggies are tender and meat is cooked.My husband and I have cooked this on our BBQ for a quick dinner too!
Have a great day!!
~Autumn"
GF note - Please make sure that the hamburger is gluten-free
Variations? Anyone have any ideas?
Sunday, February 15, 2009
Lunch - Car Camping - Grits and More
We didn’t expect to enjoy this dish as much as we did! I know, I know, the photos are at a dining room table with dishes that are not for camping ;-) But we wanted to share this dish with you and it would be pretty easy to make while camping.
First, we bought a package of grits at Trader Joe’s. We sliced it to the desired thickness and began to sauté it in a pan. We sliced up a couple of different cheeses and set them aside, then added some bacon to the same big pan. While camping this might best be done on a large griddle. If you like, move the grits through a little bit of bacon juice, just for the flavor and to keep them oiled. While that’s happening, you can heat up some soup, we use soup in the cartons from Trader Joe’s.
When the grits are hot and the bacon is almost done, put the pieces of cheese on top of the grits and heat for a couple more minutes until the cheese is hot and almost ready to melt (We used brie and a cheddar mix). Serve it up!
My wife had never had grits before and was resistant to trying them. She was pleasantly surprised, and even asked for a few more bites off my plate.
Variation? It might work with polenta instead of grits. Maybe serve it with a couple of fried eggs. Or some salsa. I bet there are a LOT of variations! Any other suggestions?
Thursday, February 5, 2009
Dinner - Car Camping - Gluten-Free Grilled Pork Loin and Sweet Potatoes
Find the recipe and photo at the following link. It looks delicious! Thanks Kate!
http://glutenfree.wordpress.com/2007/07/31/gluten-free-grilled-pork-loin-and-sweet-potatoes/
"Pork Loin Marinade (for a 2-3 pound pork loin)
1/3 c. ground pasilla chiles (buy this in the spice aisle - or better yet, at your local Mexican grocer!)
3/4 c. water
4-6 garlic cloves, minced
1 Tablespoon minced ginger
2 Tablespoons apple cider vinegar
1 Tablespoon sugar
1/2 Tablespoon olive oil
1 Tablespoon Mexican Oregano
1. Heat the olive oil up in a small sauce pan. Add the garlic and ginger and stir until very fragrant (about a minute).
2. Add the remaining marinade ingredients by whisking.
3. Simmer the marinade over low heat for 8 minutes.
4. Cool marinade to room temperature.
5. Pour marinade over pork loin in a large (enough) Ziploc bag.
6. Refrigerate until ready to grill.
Sweet Potatoes:
1. Prepare sweet potatoes by peeling and chopping into large chunks.
2. Drizzle 1-2 Tablespoons of olive oil over sweet potatoes (depending on number of potatoes).
3. Sprinkle 3/4 Tablespoon of sea salt onto potatoes.(NOTE: I also added 2 Tablespoons of brown sugar at this point - as we like our potatoes sweet.)
DIRECTIONS FOR GRILLING:
1. Heat one side of the gas grill to medium-high and the other to low (as low as it goes).
2. Grill the pork loin on the medium-high heat side for 4-5 minutes on each side (flipping once).
3. Move the pork to the low-heat side.
4. In a grill pan, put the sweet potatoes over the medium-high heat side. Turning and stirring throughout the remaining of the cooking time.
5. Cook for 12 minutes (turning potatoes throughout) then flip the pork loins. Cook an additional 12 minutes or until an internal temperature of 147F (pork) and the potatoes are tender. (Total potato cooking time: 25 minutes)
6. Remove pork and potatoes from heat. Tent the pork under aluminum foil and allow to rest for 12-15 minutes.
7. Put the sweet potatoes into a serving bowl. Since we like sweeter potatoes, I drizzled them with 2 Tablespoons of butter, 2 Tablespoons of maple syrup and 1 Tablespoon of brown sugar. Add all seasonings to taste.
Once the resting time is over, slice the pork loin thinly and serve with the grilled sweet potatoes."
Adaptation for camping - Prepare the marinade at home and put it together with the loin in a bag, then freeze the bag.
Tuesday, February 3, 2009
Dinner - Car Camping - Chicken with BBQ Sauce
Important note – Always make sure to check the ingredients to ensure that they are gluten-free.The following recipe is from Elana’s Pantry. Her website looks really great! Check it out at http://www.elanaspantry.com/
---------------------------------------------------------------
“To be honest, I am not a natural when it comes to the open flame; in general, my husband does the grilling in our family (so manly!) and slathers up the fixins’ before he throws them on the grill. In order to get my BBQ bearings I went to bbqrecipesecrets.com. On that site, I learned that there are 3 types of barbecue sauce –tomato, mustard or vinegar. Unfortunately, for me, and perhaps some of you, each of the recipes contains a significant amount of sugar, so I used their Basic Tomato BBQ sauce recipe as a map, adding and subtracting from it to create the new one below. I hope you like it Katie!
BBQ Sauce2 tablespoons grapeseed oil
3 cloves garlic,
crushed¼ cup shallots,
minced1 (7 ounce) bottle Bionaturæ® Organic Tomato Paste
1 cup orange juice, fresh squeezed
2 tablespoons apple cider vinegar
½ teaspoon dry mustard powder
½ teaspoon smoked paprika
1 teaspoon celtic sea salt
¼ teaspoon black pepper
Warm oil in a saucepan over medium low heat
Add garlic and shallot; cook until soft
Add tomato paste, orange juice, vinegar, mustard, paprika, salt and pepper
Simmer over low heat 15 to 20 minutes, stirring often
Baste over fish or chicken
Refrigerate and allow to marinate for 1-3 hours
Grill and serve Serves 6 -makes enough sauce for one whole chicken or 4 breasts”You may notice that grilling instructions are conspicuously absent –you do not want to get them from me. While my husband is not a chef, he is the grill master in the family.”
http://www.elanaspantry.com/condiments/bbq-sauce/
-------------------------------------------------------------------------------
Adaptation for camping – Prepare the marinade at home, put the chicken in a freezer bag and smother it in the sauce. Freeze it at least a day before your departure and take it out when you pack the cooler. This will do double duty to prolong the life of the chicken and also act to keep other items in the cooler a little bit colder.
Dinner - Car Camping - Grilled Vegetables
Monday, February 2, 2009
Sunday, February 1, 2009
Lunch - Car Camping - GF Macaroni and Cheese
1 cup - old Cheddar cheese
1/2 cup - shredded Swiss cheese
1/4 cup - freshly grated Parmesan cheese
1 tbsp - sorghum flour
1/2 tsp - dry mustard
1/2 tsp - salt
1/4 tsp - freshly ground white pepper
Pinch - cayenne pepper
2 cups - GF elbow pasta
1 can - 14oz 2% evaporated milk
1/4 tsp - GF Worchestershire sauce
1. In a small bowl, combine Cheddar, Swiss, Parmesan, sorghum flour, dry mustard, salt, white pepper and cayenne pepper. Set aside.
2. In a large saucepan, cook pasta in boiling water according to package instructions, until just tender. Rinse well under cold running water and drain well.
3. Return the pasta to the saucepan. Stir in milk, Worchestershire sauce and cheese mixture. Simmer, Stirring gently, over low heat until mixture boils and thickens.
This recipe is from - The Best Gluten-Free Family Cookbook – by Donna Washburn & Heather Butt
To adapt this recipe for camping -
At home - Combine the dry ingredients in a small sealable container - sorghum flour, dry mustard, salt, white pepper, cayenne pepper.
For cheese, we take a couple of sealed bags of shredded cheese with us.
If space is limited, or if it is inconvenient, you might leave the Worchestershire sauce at home.
Additional note, we used a 12 ounce can of evaporated milk, just because it was convenient, and we think it turned out fine.
For cheese, we take a couple of sealed bags of shredded cheese with us.
If space is limited, or if it is inconvenient, you might leave the Worchestershire sauce at home.
Additional note, we used a 12 ounce can of evaporated milk, just because it was convenient, and we think it turned out fine.
We really enjoy this one! Just like any pasta dish, you could add some vegetable, especially tomatoes to the Mac & Cheese.
A variation - add bacon! Yum!
Thursday, January 29, 2009
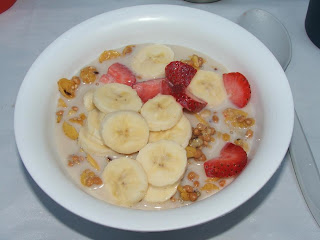
Breakfast - Car Camping - Granola and Fresh Fruit
Here is another easy one! Bring the milk product or milk substitute of your choice. When camping, we usually bring Soymilk or Almond Milk. It can be purchased in quart size containers which do not need to be refrigerated until opened. This saves room in the coolers, and since the containers are rectangular they store more easily inside the cooler and out.
It's not fair to call this a recipe, but I couldn't resist sharing it with you.
Slice some fresh fruit and put it on granola in milk.
Trader Joe's granola is an inexpensive and tasty gluten-free option.
Variation? Heat the milk!
It's not fair to call this a recipe, but I couldn't resist sharing it with you.
Slice some fresh fruit and put it on granola in milk.
Trader Joe's granola is an inexpensive and tasty gluten-free option.
Variation? Heat the milk!
Dinner - Car Camping - Salmon & Potato
This one is too easy, it almost isn’t fair! Open a container of salmon, bake a couple of potatoes, and sauté some canned mushrooms and canned green beans.
This is a good dish to save for the end of your trip, after you have consumed a lot of your fresh goods. Vary the vegetables, maybe even add some bacon bits for flavor.
Wednesday, January 28, 2009
Snack - Car Camping, Backpacking - Chocolate Crispy Treats
Recipe is from cooks.com We use mostly chocolate krispies, but we mix in some plain ones, maybe one or two cups, just for the look and to make the chocolate a little more mild. We think it tastes better ;-)
1/4 cup butter
10 ounces marshmallows
6 cups GF crispy cereal (Rice Krispies contain barley malt)
1. Melt butter in large saucepan over low heat. Add marshmallows and stir until completely melted. Remove from heat.
2. Add
3. Using buttered spatula or waxed paper, press mixture evenly into buttered 13 x 9 x 2-inch pan. Cut into squares when cool.
Yield: 24 squares, 2 x 2 inches.Note: Use fresh marshmallows for best results.
The boxes of cereal in the photo are the ones that we used for the treats in the first photo. The last I checked, Rice Krispies and Cocoa Krispies are not gluten-free. Cocoa Pebbles might be gluten-free, but you should check the ingredients before deciding to use them.
Subscribe to:
Posts (Atom)